Te mostramos el que es posiblemente uno de los proyectos más interesantes si estás iniciandote en el mundo de la electrónica y Arduino. A continuación te mostraremos paso a paso como montar y programar este radar con Arduino, el cual emplea uno de los módulos más famosos que es el sensor de ultrasonidos o también llamado HC-SR04.
Tabla de contenidos
Materiales empleados en el proyecto


A continuación veremos te mostramos los materiales que se van a emplear para realizar este radar con Arduino. Además, te mostramos una breve descripción de los mismos. Para todos aquellos que estén interesados en realizar el proyecto, te dejamos una lista con los links de compra para poder adquirir dichos materiales.
Placa de Arduino UNO: Es el cerebro de nuestro proyecto, encargada de controlar todos los procesos del mismo mediante el código que encontrarás más adelante.
Servomotores: motores de 5v con una reductora, lo que permite un gran manejo de su posición y una gran fuerza para su reducido tamaño.
Tabla de madera: La emplearemos como base donde pegar y colocar todos los componentes de nuestro proyecto
DESARROLLAMOS TU IDEA
¿Necesitas ayuda con algún proyecto?

- Prototipado y MVPs
- Arduino y ESP32
- Diseño de PCBs
- Diseño de piezas 3D
- Conexión Bluetooth
- Estudio de Viabilidad
- Optimización de costes
- Asesoría Técnica
- Internet de las Cosas
- Gestión de Patentes
Explicación paso a paso de como construir el radar con Arduino
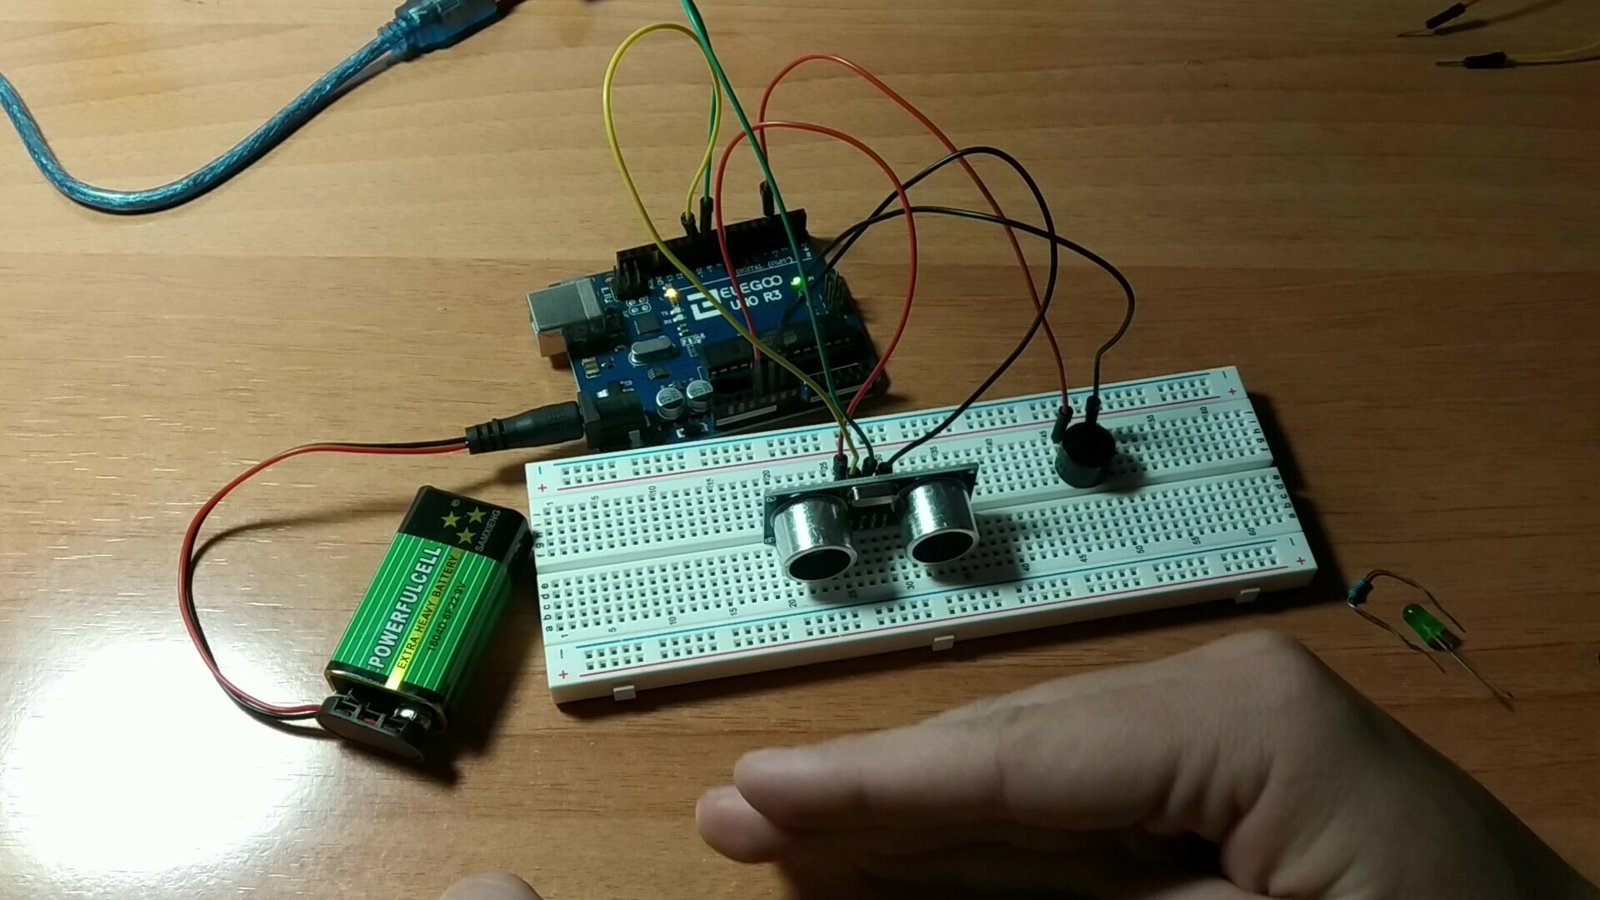
En primer lugar uniremos con cola térmica el sensor de ultrasonidos con el servomotor. Dicha unión debe hacerse con los pines del modulo HC-SR04 apuntando hacia arriba, para que no internieran con el servomotor.

A continuación rcolocaremos la placa de Arduino en la tabla de madera. En nuestro caso, nos hemos ayudado de una plataforma hecha con impresión 3D para no tener que pegar la propia placa en la madera.
Además, pegaremos tambiém el servomotor. Este debe estar bien fijado a la plataforma de madera para que no se suelte cuando gire.

Esquema de conexiones del proyecto
Para que te sea más fácil montar este proyecto, aquí tienes el esquema de conexiones. Todas las conexiones de este esquema corresponden con el código de programación que hay justo abajo, así que asegúrate de que todas están tal y como se muestra en esta imagen.

Video con explicación paso a paso del proyecto
Si lo que buscas es ver de una forma mucho más detallada de como realizar este proyecto desde el inicio hasta el final y una explicación del código, a continuación se muestra el video con dicho contenido, mucho mas visual y fácil de comprender. Y recuerda, si te gusta esta clase de contenido, no olvides suscribirte.
Códigos de Arduino para la programación un radar con sensor de ultrasonidos
A continuación se muestra el código de programación desarrollado específicamente para este proyecto. Los pines que puedes encontrar en el código son los mismos que encontrarás en el esquema de conexiones previamente mostrado.
Si tienes dudas sobre cómo usar o instalar el entorno de programación empleado para Arduino, te dejamos un link de comó descargar el IDE de Arduino
//CODIGO ARDUINO
//Canal de YT -> RobotUNO
//Proyecto RADAR
#include <Servo.h>
const int trigPin = 10;
const int echoPin = 11;
long duration;
int distance;
Servo myServo;
void setup() {
  pinMode(trigPin, OUTPUT);
  pinMode(echoPin, INPUT);
  Serial.begin(9600);
  myServo.attach(12);
}
void loop() {
  for(int i=15;i<=165;i++){
  myServo.write(i);
  delay(30);
  distance = calculateDistance();
  Serial.print(i);
  Serial.print(",");
  Serial.print(distance);
  Serial.print(".");
  }
  for(int i=165;i>15;i--){
  myServo.write(i);
  delay(30);
  distance = calculateDistance();
  Serial.print(i);
  Serial.print(",");
  Serial.print(distance);
  Serial.print(".");
  }
}
int calculateDistance(){
  digitalWrite(trigPin, LOW);
  delayMicroseconds(2);
  digitalWrite(trigPin, HIGH);
  delayMicroseconds(10);
  digitalWrite(trigPin, LOW);
  duration = pulseIn(echoPin, HIGH);
  distance= duration*0.034/2;
  return distance;
}
Códigos de programación para la aplicación de processing
A continuación también te dejamos los códigos para descargar la aplicación de processing.
Si no la tienes instalada, puedes descargarla pinchando AQU?.
IMPORTANTE! En la línea 19 deberemos comprobar en que puerto está conectado y modificar «COM7» por el que corresponda en tu caso.
import processing.serial.*; // imports library for serial communication
import java.awt.event.KeyEvent; // imports library for reading the data from the serial port
import java.io.IOException;
Serial myPort; // defines Object Serial
// defubes variables
String angle="";
String distance="";
String data="";
String noObject;
float pixsDistance;
int iAngle, iDistance;
int index1=0;
int index2=0;
PFont orcFont;
void setup() {

 size (1200, 700); // ***CHANGE THIS TO YOUR SCREEN RESOLUTION***
 smooth();
 myPort = new Serial(this,"COM7", 9600); // starts the serial communication
 myPort.bufferUntil('.'); // reads the data from the serial port up to the character '.'. So actually it reads this: angle,distance.
}
void draw() {

  fill(98,245,31);
  // simulating motion blur and slow fade of the moving line
  noStroke();
  fill(0,4);
  rect(0, 0, width, height-height*0.065);

  fill(98,245,31); // green color
  // calls the functions for drawing the radar
  drawRadar();
  drawLine();
  drawObject();
  drawText();
}
void serialEvent (Serial myPort) { // starts reading data from the Serial Port
  // reads the data from the Serial Port up to the character '.' and puts it into the String variable "data".
  data = myPort.readStringUntil('.');
  data = data.substring(0,data.length()-1);

  index1 = data.indexOf(","); // find the character ',' and puts it into the variable "index1"
  angle= data.substring(0, index1); // read the data from position "0" to position of the variable index1 or thats the value of the angle the Arduino Board sent into the Serial Port
  distance= data.substring(index1+1, data.length()); // read the data from position "index1" to the end of the data pr thats the value of the distance

  // converts the String variables into Integer
  iAngle = int(angle);
  iDistance = int(distance);
}
void drawRadar() {
  pushMatrix();
  translate(width/2,height-height*0.074); // moves the starting coordinats to new location
  noFill();
  strokeWeight(2);
  stroke(98,245,31);
  // draws the arc lines
  arc(0,0,(width-width*0.0625),(width-width*0.0625),PI,TWO_PI);
  arc(0,0,(width-width*0.27),(width-width*0.27),PI,TWO_PI);
  arc(0,0,(width-width*0.479),(width-width*0.479),PI,TWO_PI);
  arc(0,0,(width-width*0.687),(width-width*0.687),PI,TWO_PI);
  // draws the angle lines
  line(-width/2,0,width/2,0);
  line(0,0,(-width/2)*cos(radians(30)),(-width/2)*sin(radians(30)));
  line(0,0,(-width/2)*cos(radians(60)),(-width/2)*sin(radians(60)));
  line(0,0,(-width/2)*cos(radians(90)),(-width/2)*sin(radians(90)));
  line(0,0,(-width/2)*cos(radians(120)),(-width/2)*sin(radians(120)));
  line(0,0,(-width/2)*cos(radians(150)),(-width/2)*sin(radians(150)));
  line((-width/2)*cos(radians(30)),0,width/2,0);
  popMatrix();
}
void drawObject() {
  pushMatrix();
  translate(width/2,height-height*0.074); // moves the starting coordinats to new location
  strokeWeight(9);
  stroke(255,10,10); // red color
  pixsDistance = iDistance*((height-height*0.1666)*0.025); // covers the distance from the sensor from cm to pixels
  // limiting the range to 40 cms
  if(iDistance<40){
    // draws the object according to the angle and the distance
  line(pixsDistance*cos(radians(iAngle)),-pixsDistance*sin(radians(iAngle)),(width-width*0.505)*cos(radians(iAngle)),-(width-width*0.505)*sin(radians(iAngle)));
  }
  popMatrix();
}
void drawLine() {
  pushMatrix();
  strokeWeight(9);
  stroke(30,250,60);
  translate(width/2,height-height*0.074); // moves the starting coordinats to new location
  line(0,0,(height-height*0.12)*cos(radians(iAngle)),-(height-height*0.12)*sin(radians(iAngle))); // draws the line according to the angle
  popMatrix();
}
void drawText() { // draws the texts on the screen

  pushMatrix();
  if(iDistance>40) {
  noObject = "Out of Range";
  }
  else {
  noObject = "In Range";
  }
  fill(0,0,0);
  noStroke();
  rect(0, height-height*0.0648, width, height);
  fill(98,245,31);
  textSize(25);

  text("10cm",width-width*0.3854,height-height*0.0833);
  text("20cm",width-width*0.281,height-height*0.0833);
  text("30cm",width-width*0.177,height-height*0.0833);
  text("40cm",width-width*0.0729,height-height*0.0833);
  textSize(40);
  text("FABRI creator", width-width*0.875, height-height*0.0277);
  text("?ngulo: " + iAngle +" ?", width-width*0.48, height-height*0.0277);
  text("Dist:", width-width*0.26, height-height*0.0277);
  if(iDistance<40) {
  text("        " + iDistance +" cm", width-width*0.225, height-height*0.0277);
  }
  textSize(25);
  fill(98,245,60);
  translate((width-width*0.4994)+width/2*cos(radians(30)),(height-height*0.0907)-width/2*sin(radians(30)));
  rotate(-radians(-60));
  text("30?",0,0);
  resetMatrix();
  translate((width-width*0.503)+width/2*cos(radians(60)),(height-height*0.0888)-width/2*sin(radians(60)));
  rotate(-radians(-30));
  text("60?",0,0);
  resetMatrix();
  translate((width-width*0.507)+width/2*cos(radians(90)),(height-height*0.0833)-width/2*sin(radians(90)));
  rotate(radians(0));
  text("90?",0,0);
  resetMatrix();
  translate(width-width*0.513+width/2*cos(radians(120)),(height-height*0.07129)-width/2*sin(radians(120)));
  rotate(radians(-30));
  text("120?",0,0);
  resetMatrix();
  translate((width-width*0.5104)+width/2*cos(radians(150)),(height-height*0.0574)-width/2*sin(radians(150)));
  rotate(radians(-60));
  text("150?",0,0);
  popMatrix();
}